Showing posts with label Guides. Show all posts

Saturday, December 24, 2011

WPF: MVVM, Quickstart

Read and follow this GREAT article instructions...
http://www.codeproject.com/KB/WPF/WpfMvvmQuickStart.aspx

Background reading that helps

Useful resources


Wednesday, September 28, 2011

GUIDE: Create your own free, cross platform binary log file with a viewer, with ease.

Hi, it can be done, and within days. Let's start...

Introduction
Did your boss just came to your office and asked you to dump stuff from the application to sniff what's going on in component #42?

Later on he'll might come and ask statistics, that it should support UNIX/Window/MAC/... , filtering, simple graphs, flow graph ...

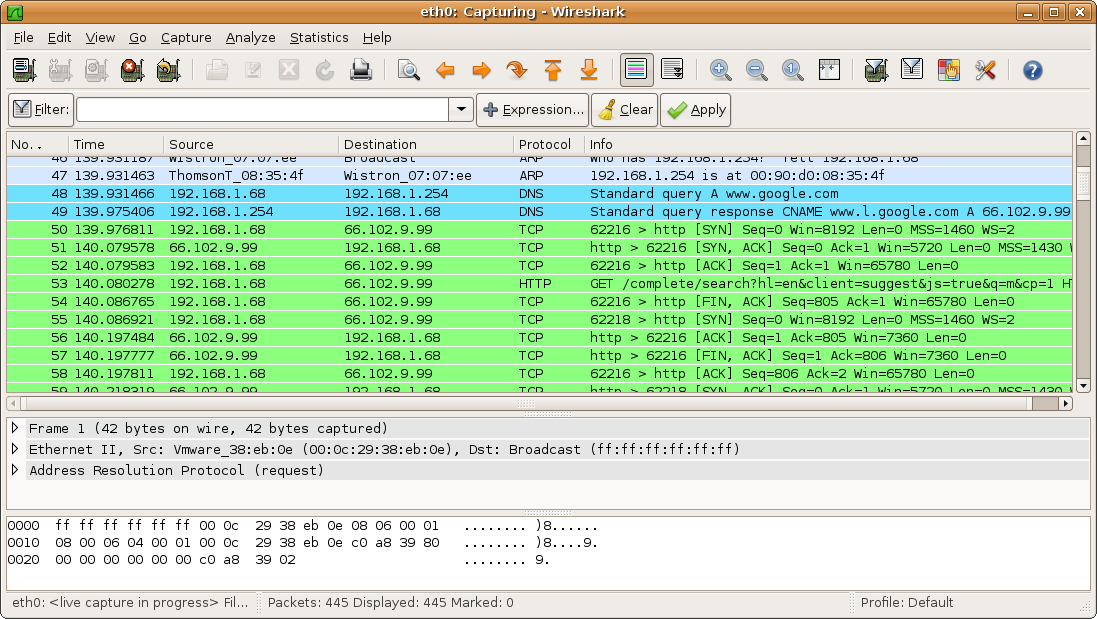
Here are some pictures of these features in action:
I've wrote a tutorial to create a very simple (starter) sniffer. 

Wednesday, July 13, 2011

GUIDE: Installing PHP.

Hi,
Just start playing with PHP and I thought it might be usefull for others if i'll write my experiance with it.

Instalation guide

  1. Download PHP (download the zip version / Thread safe)
    1. http://windows.php.net/download/
  2. Unzip it to 'C:\PHP\'.
  3. Installing 
    1. Open the file 'C:\PHP\php_manual_en.chm'
    2. Follow the instalation directions (best way i found).
Have fun!

Thursday, May 5, 2011

GUIDE: LUA unit testing and TDD

I've just uncovered this subject, here is my insights:

Fast start
  1. Open LUA
  2. Start a new test file (let's call it 'my_code.tests.lua').
  3. Edit 'my_code.tests.lua' (example template below)


--- my_code.tests.lua Code --------------------------------------------

-- Some super function to test
function my_super_function( arg1, arg2 ) return arg1 + arg2 end

-- Unit testing starts
require('luaunit')

TestMyStuff = {} --class
    function TestMyStuff:testWithNumbers()
        a = 1
        b = 2
        result = my_super_function( a, b )
        assertEquals( type(result), 'number' )
        assertEquals( result, 3 )
    end

    function TestMyStuff:testWithRealNumbers()
        a = 1.1
        b = 2.2
        result = my_super_function( a, b )
        assertEquals( type(result), 'number' )
        -- I would like the result to be always rounded to an integer
        -- but it won't work with my simple implementation
        -- thus, the test will fail
        assertEquals( result, 3 )
    end

-- class TestMyStuff

luaUnit:run()


--- Code End -----------------------------------------------------------------------
  1. Execute the test code.
  2. Add your tests and assumption checking.
  3. Fix what's broken.
Understand more

Monday, May 2, 2011

GUIDE: Creating your own fast Wireshark plugin / dissector using LUA.

After hitting my head agains the keyboard to create my own LUA protocol, I've desided that none shall suffer anymore.

Some background to understand stuff

  • Wireshark reads PCAP file format for captured files.
  • Wireshark can be extended using C code or, for fast development you can use LUA code (I'll explain later...).


Creating LUA based plugin / dissector

  1. Download and install Wireshark.
  2. Create LUA dissector (let's save it as 'trivial.lua')

-- trivial protocol example
-- declare our protocol
trivial_proto = Proto("trivial","Trivial Protocol")
-- create a function to dissect it
function trivial_proto.dissector(buffer,pinfo,tree)
    pinfo.cols.protocol = "TRIVIAL"
    local subtree = tree:add(trivial_proto,buffer(),"Trivial Protocol Data")
    subtree:add(buffer(0,2),"The first two bytes: " .. buffer(0,2):uint())
    subtree = subtree:add(buffer(2,2),"The next two bytes")
    subtree:add(buffer(2,1),"The 3rd byte: " .. buffer(2,1):uint())
    subtree:add(buffer(3,1),"The 4th byte: " .. buffer(3,1):uint())
end
-- load the udp.port table
udp_table = DissectorTable.get("udp.port")
-- register our protocol to handle udp port 7777
udp_table:add(7777,trivial_proto)

  1. Edit  ...\Wireshark\init.lua file as follows
    1. disable_lua = false
    2. At the end of the file: dofile("trivial.lua") 
      1. You can read more here - http://simplestcodings.com/2011/01/09/how-to-use-lua-to-create-wireshark-dissector/
  2. Open Wireshark
    1. Menu >> Edit >> Preferences >> Protocols >> DLT_USER >> Edit >> New:
      1. DLT: User 0 (147)
      2. Payload protocol: MyProtocolName
      3. Header size 0
      4. Trailer size: 0
      5. Press OK
  3. Create PCAP dumps for analyze.
    1. Using HEX-Editor (see below for nice hex-editor recomendations).
    2. If you can - ask the protocol team to provide their dumps. 
  4. Open the PCAP dump for editing (binary mode).
    1. Change the dump's 'Global Header' section / 'data link type' (network) to 147 (LINKTYPE_USER0)
      1. Read more here - http://www.tcpdump.org/linktypes.html
    2. save it.
  5. Load the dump to Wireshark for analyses.
  6. Start changing the trivial.lua code to parse your protocol.
Hope this will bring you to a working point fast. In the process read related stuff to understand more, you can upgrade this solution to create better and better protocol sniffer using Wireshark.


More nice stuff that can help

GUIDE: dotNetInstaller - Free fast and easy installer for windows

In a nutshell
  1. Download dotNetInstaller: setup bootstrapper for Windows
    1. Great tutorials:
      1. http://www.codeproject.com/KB/install/dotNetInstaller.aspx
      2. http://code.dblock.org/ShowPost.aspx?Id=118
  2. Read this article if you're using 'Setup project using the Windows Installer'.
    1. http://www.simple-talk.com/dotnet/visual-studio/updates-to-setup-projects/
  3. Read this article if you'r using 'Install shield limited edition'.
    1. http://blogs.msdn.com/b/somasegar/archive/2009/12/14/building-setup-and-deployment-packages-in-vs-2010.aspx
  4. If using MSI file...
    1. http://codefornothing.wordpress.com/2007/11/27/short-msi-tutorial/
    2. http://technet.microsoft.com/en-us/library/cc759262(WS.10).aspx
    3. http://www.advancedinstaller.com/user-guide/msiexec.html
    4. http://www.robvanderwoude.com/msiexec.php

Command line utilities for the job


REM Option Explicit

Dim exitcode : exitcode = 0

REM --- Functions ------------------------------------------------------------------


function readFromRegistry (strRegistryKey, strDefault )
    Dim value
 Dim objFSO, WSHShell

    On Error Resume Next
 Set objFSO   = CreateObject("Scripting.FileSystemObject")      
 Set WSHShell = CreateObject("Wscript.Shell")
    value = WSHShell.RegRead( strRegistryKey )

    if err.number <> 0 then
        readFromRegistry= strDefault
    else
        readFromRegistry=value
    end if

    set WSHShell = nothing
end function


function readDataFromMsiFile(file_path)
 Set objInstaller = CreateObject("WindowsInstaller.Installer")
 Set objProduct = objInstaller.SummaryInformation(file_path)
 Wscript.Echo "Code page: " &objProduct.Property(1)
 Wscript.Echo "Title: " & objProduct.Property(2)
 Wscript.Echo "Subject: " & objProduct.Property(3)
 Wscript.Echo "Author: " & objProduct.Property(4)
 Wscript.Echo "Keywords: " & objProduct.Property(5)
 Wscript.Echo "Comment: " & objProduct.Property(6)
 Wscript.Echo "Template: " & objProduct.Property(7)
 Wscript.Echo "Last Author: " & objProduct.Property(8)
 Wscript.Echo "Revision number: " & objProduct.Property(9)
 Wscript.Echo "Edit Time: " & objProduct.Property(10)
 Wscript.Echo "Last Printed: " & objProduct.Property(11)
 Wscript.Echo "Creation Date: " & objProduct.Property(12)
 Wscript.Echo "Last Saved: " & objProduct.Property(13)
 Wscript.Echo "Page Count: " & objProduct.Property(14)
 Wscript.Echo "Word Count: " & objProduct.Property(15)
 Wscript.Echo "Character Count: " & objProduct.Property(16)
 Wscript.Echo "Application Name: " & objProduct.Property(18)
 Wscript.Echo "Security: " & objProduct.Property(19)

 Set objProduct = Nothing
 Set objInstaller = Nothing

end function

function ProductVersion()
 ' SOURCE: http://stackoverflow.com/questions/815744/retrieving-version-of-an-msi-file-built-with-wix
 Dim installer, database, view, result

 Set installer = CreateObject("WindowsInstaller.Installer")
 Set database = installer.OpenDatabase (".\installer.msi", 0)

 Dim sumInfo  : Set sumInfo = installer.SummaryInformation(".\installer.msi", 0)
 sPackageCode =  sumInfo.Property(9) ' PID_REVNUMBER = 9, contains the package code.

 Set view = database.OpenView ("SELECT Value FROM Property WHERE Property='ProductVersion'")
    view.Execute
    Set result = view.Fetch
 
    ProductVersion = result.StringData(1)
end function
REM --- Code -------------------------------------------------------------------
new_version = ProductVersion()
installed_version = readFromRegistry ("HKEY_LOCAL_MACHINE\SOFTWARE\Microsoft\Windows\CurrentVersion\Uninstall\{12345678-D8EF-4EE9-8DC4-FF5911256E0D}\DisplayVersion", "0.0.0" )
uninstall_user_result = MsgBox("About to install " + new_version + " instead of " + installed_version + ", continue?",3,"Please answer")


Select Case uninstall_user_result
 Case 6 ' Yes
  exitcode = 0
  
 Case Else
  exitcode = 1 
End Select

WScript.Quit exitcode  REM return results

Executing VBScripts from command line
Hope it helps.

Thursday, April 7, 2011

GUIDE: TDD unit testing tools for Tcl

As promised in http://shloemi.blogspot.com/2011/03/tdd-tools-for-tcl.html here is my experience with tcltest package and eclipse.


The story
Suppose we have a function called 'bits_serialize'.

This function should serialize a given data into bits_per_io bits per package (for examples see the tests below and what they return).

This function have the following signature:  bits_serialize {bits_per_io description}, where:
  • bits_per_io
    • How much bits each package have.
  • description
    • a pair of {data bits}, where:
      • data 
        • the data we want to serialize.
      • bits
        • the size, in bits, we want to serialize this data.
let's test this function using tcltest...

Test code
# Generated using http://pygments.org/
source unit-under-test.tcl ;# contains the definition of bits_serealize 

test base--always-ok {This is as simple as it gets.} -constraints {
} -setup {
} -body {
 return TRUE
} -cleanup {
} -result TRUE

test bits_serealize--partial-quanta {description here...} -constraints {
} -setup {
} -body {
 return [bits_serealize 32 " 0x01 16 "]
} -cleanup {
} -result [list 1]

test bits_serealize--full-quanta {description here...} -constraints {
} -setup {
} -body {
 return [bits_serealize 32 " 0xFFFFFFFF 32 "]
} -cleanup {
} -result [list [ format "%u" 0xFFFFFFFF ]]

test bits_serealize--over-quanta {description here...} -constraints {
} -setup {
} -body {
 return [bits_serealize 32 " 0x060504030201 64 "]
} -cleanup {
} -result [list [ format "%u" 0x04030201 ] [ format "%u" 0x0605 ]]

test bits_serealize--way-over-quanta {description here...} -constraints {
} -setup {
} -body {
 return [bits_serealize 32 " 0x060504030201 320 "]
} -cleanup {
} -result [list [ format "%u" 0x04030201 ] [ format "%u" 0x0605 ] 0 0 0 0 0 0 0 0]

test bits_serealize--cross-quanta {description here...} -constraints {
} -setup {
} -body {
 return [bits_serealize 32 "
  0xFF 1
  0xFF 2
  0xFF 3
  0xFF 4
  0xFF 6

  0x04030201 32
 "]
} -cleanup {
} -result [list [ format "%u" 0x201FFFF ] [ format "%u" 0x403 ]]

test bits_serealize--quanta-and-half {description here...} -constraints {
} -setup {
} -body {
 return [bits_serealize 32 "
  0xFFEEDDCCBBAA 48
 "]
} -cleanup {
} -result [list [ format "%u" 0xDDCCBBAA ] [ format "%u" 0xFFEE ]]


eclipse-unit-testing

Results

++++ base--always-ok PASSED
++++ bits_serealize--partial-quanta PASSED
++++ bits_serealize--full-quanta PASSED
++++ bits_serealize--over-quanta PASSED
++++ bits_serealize--way-over-quanta PASSED
++++ bits_serealize--cross-quanta PASSED
++++ bits_serealize--quanta-and-half PASSED

My impression 

I definitely recommend using this unit!! and to my surprise eclipse supports it built in (see picture ==>).

Tuesday, March 29, 2011

GUIDE: tclunit/TDD for Tcl, usage and examples.

As promised (tdd-tools-for-tcl.html) here is my humble experience/research with tclunit.

Guides / tutorials found


Research results

Usage example

Have fun...

Sunday, March 27, 2011

GUIDE/TWEAK: Improve Eclipse load time

In my old station Eclipse load around 35~37 seconds. This is slow!
After a short research I've found that there is a way to speed things up...
After executing this steps I've improved the load time to ~11 seconds.

Uninstall unnecessary plugins
  1. Eclipse menu -> Help -> Install New Software
  2. On the lower right you'll find 'what is already installed?' Click it.
  3. On the 'Installed Software' tab select the wanted plug-ins and select 'Uninstall...'.
  4. Follow the instructions...


Configuring the Eclipse.ini file to improve performance.
NOTE - Execute the following steps on your own risk!! I'm not responsible (It works for me).

  1. Close Eclipse
  2. Goto your Eclipse root folder.
  3. MAKE COPY / DUPLICATE THE ORIGINAL 'eclipse.ini' FILE before moving to the next step!!!
  4. Edit the file 'eclipse.ini' to contain the folwing text:
-data
C:/Devenv/Devenv eclipse workspace
-showlocation
-showsplash
org.eclipse.platform
--launcher.defaultAction
openFile
-vm
C:/Program Files/Java/jre6/bin/client/jvm.dll
-vmargs
-Dosgi.requiredJavaVersion=1.6
-Declipse.p2.unsignedPolicy=allow
-Xms128m
-Xmx384m
-Xss4m
-XX:PermSize=128m
-XX:MaxPermSize=384m
-XX:CompileThreshold=5
-XX:MaxGCPauseMillis=10
-XX:MaxHeapFreeRatio=70
-XX:+CMSIncrementalPacing
-XX:+UnlockExperimentalVMOptions
-XX:+UseG1GC
-XX:+UseFastAccessorMethods
-Dcom.sun.management.jmxremote
  • If any thing goes wrong - use the duplicated file you made at step 4!!


Have fun...

Solution sources

Wednesday, March 23, 2011

Guide: Drawing graph for free using GraphViz opensource lib.


  • file.dot


digraph G {
Yehiel -> Shlomi;
Aviva -> Shlomi;

David -> Rotem;
Ilana -> Rotem;

Shlomi -> Yeara;
Rotem -> Yeara;
}


  • Command line example

drive:> "c:\Program Files\Graphviz path\bin\dot.exe" -Tbmp file.dot -o out.bmp


  • Output (out.bmp)
(see above ...)

Monday, March 14, 2011

Guide: Tcl documentation / manuals for Eclipse

This is very helpful and reduces the time it takes to open IE + open the Tcl help web page + typing the wanted Tcl command +++...

Here are the steps
  1. download the appropriate Tcl manuals from here
  2. unzip the html files to an appropriate location.
    • for our example: 'C:\Tcl\doc\html'
  3. open eclipse, Menu->window->preferances->Click
  4. Tcl->Man Pages->Configure->Add->Click
  5. Alternatively, in the filter type: 'man' t\and select Tcl/Man pages.
  6. Name: Tcl/Mans
  7. Add->Click
  8. Folder: 'C:\Tcl\doc\html'
  9. Ok, Ok, Ok


Test it
press F2 on the 'proc', 'set' or 'lappend' keywords to start using the help...

Enjoy...

Sources
1. Tcl manuals
2. The guide I used to connect eclipse and the Tcl manuals

Tuesday, February 22, 2011

Guide: Connect Eclipse to SVN

Installing SVN for Eclipse


Eclipse->Menu->Help->Install new software...click
Work with='http://download.eclipse.org/releases/helios'
Collaboration... select the following (click the picture for details...):


1. Subversive revision graph.
2. Subversive SVN Integration for Mylyn project.
3. Subversive SVN JDT Ignore Extensions.
4. Subversive SVN Team Provider.
Next...Next...Accept licence...Finish.

Select the appropriate SVN connector (native or Java base, and the appropriate SVN version) and follow the instructions according to your selection.

Using SVN


Connecting to an existing SVN repository


Eclipse->File->Import...SVN->Project from SVN...
URL:...Browse...
Authentication...if needed.
Next...Finish...Follow the instruction.

Connect your project to an existing SVN


Eclipse->Right click the wanted project->Team->Share Project...->SVN->Next
URL: Paste the SVN repository path...Browse...Select SVN path...
Next...Follow the wizards...
Your done.

Sunday, February 20, 2011

Guide: Setting up Eclipse with DLTK and ActiveState to debug TCL.

Let's start working...

Download and install Eclipse SDK
1. Download Eclipse (I used 'Eclipse IDE for Java Developers').
2. Unzip (or install, depends on the download type) to your favorite location.

Download and install DLTK
3. Run Eclipse.exe from that location.
4. Menu->Help->Install new software...
5. Right of 'Work with:' click the 'Add' button.
6. In the name enter 'DLTK'
7. location = 'http://download.eclipse.org/technology/dltk/updates/'
8. Click OK and wait a few seconds for the Eclipse environment to fetch the versions.
9. Select the appropriate version (for 'Helios Eclipse SDK' (version 3.6.1) I used DLTK 2.0v). Note: You can select the minimum for TCL (listed below), I selected all the DLTK.
10. Next.. Next ... Accept the license agreement, Wait for the download to finish.

here is a minimum list i found to install TCL DLTK:
>>> Dynamic Language Toolkit – Core Frameworks
>>> Dynamic Language Toolkit – Core Frameworks SDK
>>> Dynamic Language Toolkit – iTCL Development Tools
>>> Dynamic Language Toolkit – iTCL Development Tools SDK
>>> Dynamic Language Toolkit – TCL Development Tools
>>> Dynamic Language Toolkit – TCL Development Tools SDK
>>> Dynamic Language Toolkit – XOTcl Development Tools
>>> Dynamic Language Toolkit – XOTcl Development Tools SDK

Setting up Eclipse Tcl interpreter
11. Download and install TCL Shell and interpreter.
12. Using Eclipse IDE: Menu->Window->Preferences->TCL->Interpreters
13. click 'Add'
1. Name='TCL'
2. Browse... path to the Tcl interpreter executable (I've installed it at '')

Setting up Eclipse Tcl debugger
14. Install 'Komodo remote debugger'
15. Using Eclipse IDE: Menu->->Window->Preferences->TCL->Debug->Engines->Active State
16. Under 'Paths' tab->'External debugger engine'->Path->...->Select the debugger path and file ('dbgp_tcldebug.exe' for windows).


Now you are all set. You should be able to choose new TCL project, write your Tcl code and debug your programs.

Other posts used to create this instalation guide:
* http://blogsai.wordpress.com/2009/10/15/configuring-eclipse-as-tcltk-ide/
*

Have fun...